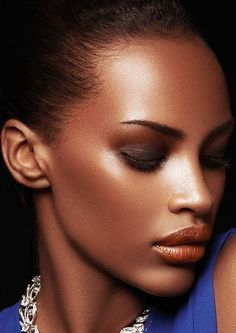
Your face is your canvas. Paint it beautifully to match the lovely days of summer! Here are two makeup techniques that will make all the difference to the way you look.
Strobing
What on earth is strobing, and what does it have to do with makeup? This is probably the question that almost everyone is asking themselves.
Strobing is the intense
highlighting and layering of highlighters on the high points of the face. Now you are probably saying to yourself (in a completely sarcastic tone)...That's not going to make me look cakey at all! However, it won't, if you do it properly.
When you highlight your face you essentially bring that feature forward, to make it stand out. You would normally do this to the tops of your cheekbones, your brow bone, nose, cupid's bow and the inner corner of your eyes, depending on the look you are going for.
These are generally all the points of the face that naturally first come into contact with light.
You want to strobe if you have contoured your face or plan on it. You cannot have all these light and bright points on your face without any contrasting 'darkness' and vice versa.
Remember to use as little product as possible as this will give you a natural look; you want a 'natural glow' that will highlight your features, and not to look like a triple layered cake.
You would want to start off by using a cream product and then layering a powder product over it.
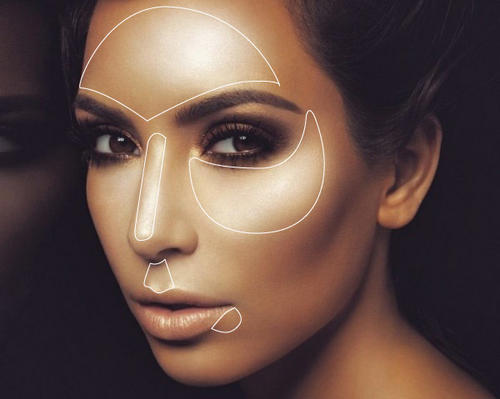
Brow bone
Placing a highlighter over your eyebrow slightly above the arch of the eyebrow. Also place some below the eyebrow after the arch.
Cheeks
Start off by using a cream highlighter; place a small amount of the product starting at the tail of your eyebrow and in a c shape on your cheek bone bring it down towards the apple of your cheek; stop when the product is in line with your pupil.
You do not want to bring the highlighter too close to the nose or lower down towards the cheek as it will place an emphasis on your pores and make them look bigger than what you would want them to look.
Nose
You would strobe your nose to make it appear smaller (slimmer) as well as to bring it forward. Place the highlighter down the bridge of your nose. If you have a bump on your nose and don't want to accentuate it, then do not place the highlighter on the bump, place it slightly above the bump and below the bump and take it down to the tip of the nose. That way, it will appear as though you do not have a bump on your nose. If you don't have a bump, you can simply place the highlighter down the bridge of your nose to the tip of your nose.
Cupid's Bow
The Cupid's bow is the 'M' shame of your top lip. You want to place the highlighter here as it will bring your lip forward and make it appear as though it is much bigger than it is.
Inner corner of the eye
Place a small amount of highlighter in the inner corner of your eyes to give them the appearance of being bigger.
Once the cream highlighter has been placed over a particular area, make sure to go over it with your favourite powder highlighter. This will set the highlighted area and give it a more intense and natural glow.
When using the cream highlighter make sure to use your fingers to blend in the product as this will have a more natural effect on the skin. Always tap the product in with your fingers and do not smear it across your face. Smearing the product will make your
foundation move and blend with the highlighter; tapping the highlighter will make it stick to the area where you want it in and also stop it from ruining your foundation.
Contouring
In the world of makeup, contouring means making darker. Apply it to the parts of your face that you want to look smaller, more defined, or sunken in.
Contour with a product that is either cream or
powder based. You could even layer the products like you do with the strobing. The product that you contour with should be matte (no shimmery products) and 3 to 4 shades darker than your natural skin tone.
Smaller forehead
To give the illusion of a smaller forehead, place the product up and along the temples of your head, starting at the arch of your eyebrow and up towards your hairline, following a diagonal line. Apply all across the hairline following your natural face shape. Be sure to blend the product into the skin with a patting or dabbing motion; this will make it look more natural.
Slimmer face
Place the product as you did next to the temples and move down along the hairline towards the hollows of the cheek bones.
If you take a pencil and place it from the corner of your mouth to your tragus (mid section of your ear), that will be the natural line that you would want to follow coming from your temple contour.
Defined jawline
Define your jawline by taking your contour shade along the natural bone shape of your jaw. Just remember that the sharper you make your jaw line look, the older you will appear.
Nose
Go down along the side of the nose; the straighter you make the lines, the straighter your nose will appear. The closer the lines are drawn to the centre of the nose, the slimmer the nose will appear; the further apart the lines are drawn, the wider your nose will appear.
If you feel that you need to strobe and contour all areas of your face - you can, but do not do what is unnecessary. The objective is to look as natural as possible, depending on the occasion.