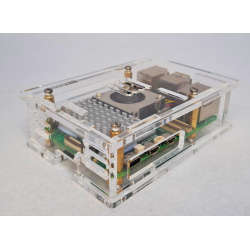
Clear Acrylic Raspberry Pi 5 Case(A), Fully closed case, Supports the Official Active Cooler

Clear Acrylic Raspberry Pi 5 Case(A), Fully closed case, Supports the Official Active Cooler

57 available / new
Indicative market price: R165.76
R150.69
Shipping
R35.00 Standard shipping using one of our trusted couriers applies to most areas in South Africa. Some areas may attract a R30.00 surcharge. This will be calculated at checkout if applicable.
Check my rate
The seller has indicated that they will usually have this item ready to ship within 2 business days. Shipping time depends on your delivery address. The most accurate delivery time will be calculated at checkout, but in general, the following shipping times apply:
 
Standard Delivery
Main centres:  1-3 business days
Regional areas: 3-4 business days
Remote areas: 3-5 business days
Seller
Buyer protection
Get it now, pay later

Product details

Condition
New
Location
South Africa
Product code
3332
Bob Shop ID
614633313
This case was designed for the Raspberry Pi 5 board with space to install the Official Active Cooler (The Raspberry Pi 5 board and Active Cooler are NOT Included)

We also have a more open option with no sides available.

This DIY case requires assembly. You will need a small precision flathead screwdriver.

Clear 3mm Acrylic Panels to protect your Raspberry Pi 5.

Features

Openings For

  • 40PIN GPIO
  • PCIe
  • DSI/CSI Interfaces
  • Wall mounting holes
  • Airflow Vents On The Top And Front
  • With Power On/Off Button
  • Easy To Pull & Plug TF Card On The Bottom
 

What's in the box?

1 x PI5 Acrylic Case A
1 x Nonskid rubber pad (4PCS)
1 x Screwdriver
1 x Screws and standoffs pack

Resources


How To Install

The Case Consists Of 6 Layers Of Acrylic Panels. Install According To The Following Steps


1. Install the active cooler on the Raspberry Pi 5.


2. Install the short standoffs and screws onto the 1st acrylic panel, please pay attention to the orientation.


3. Install the long female to female standoffs on the RPi board


4. Install the 4 acrylic panel to the sides of the Raspberry Pi 5. 


Don't forget to install the little power button first.


5. Install the top plate. This is where all the bits come together. You might experience a bit of difficulty aligning all the plates. A bit of pressure on the top plate helps to get all to pop into place.


6. Insert the top 4 screws that holds it all together. You don't have to use force to tighten them.


Note: Stock is currently available in South Africa for national shipping!
Add to cart

Similar products

9% OFF
Official Raspberry Pi 3A Red & White Case
R92.69 R101.96
Raspberry Pi Official Raspberry Pi 3 Red & White Case
R269.00
Clear Acrylic Case For Raspberry Pi Zero & Zero W
R335.00
9% OFF
Raspberry Pi 5 active cooler
R115.88 R127.47