

| Main centres: | 1-3 business days |
| Regional areas: | 3-4 business days |
| Remote areas: | 3-5 business days |
A stepper motor can move in accurate, fixed angle increments known as steps. For practical purposes, a stepper motor is a bit like a servo: you can tell it to move to a pre-defined position and can count on getting fairly consistent results with multiple repetitions. Servos though, are usually limited to a 0-180 degree range, while a stepper motor can rotate continuously, similar to a regular DC motor. The advantage of steppers over DC motors is that you can achieve much higher precision and control over the movement. The downside of using steppers is that they are a bit more complex to control than servos and DC motors.
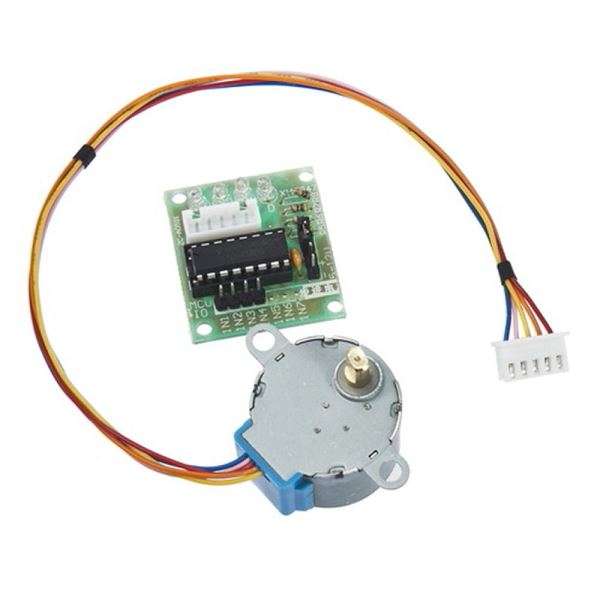
The 28BYJ-48 Stepper Motor
The motor has 4 coils of wire that are powered in a sequence to make the magnetic motor shaft spin. When using the full-step method, 2 of the 4 coils are powered at each step. The default stepper library that comes pre-installed with the Arduino IDE uses this method. The 28BYH-48 datasheet specifies that the preferred method for driving this stepper is using the half-step method, where we first power coil 1 only, then coil 1 and 2 together, then coil 2 only and so on…With 4 coils, this means 8 different signals.
The ULN2003 stepper motor driver
The ULN2003 stepper motor driver board allows you to easily control the 28BYJ-48 stepper motor from a microcontroller, like the Arduino Uno. One side of the board side has a 5 wire socket where the cable from the stepper motor hooks up and 4 LEDs to indicate which coil is currently powered. The motor cable only goes in one way, which always helps. On the side you have a motor on / off jumper (keep it on to enable power to the stepper). The two pins below the 4 resistors, is where you provide power to the stepper. Note that powering the stepper from the 5 V rail of the Arduino is not recommended. A separate 5-12 V 1 Amp power supply or battery pack should be used, as the motor may drain more current than the microcontroller can handle and could potentially damage it. In the middle of the board we have the ULN2003 chip. At the bottom are the 4 control inputs that should be connected to four Arduino digital pins.


Courier via Aramex Courier.

I can longer make use of the South African Post Office due to the ongoing lack of service delivery.
Payment is expected via bobpay within 24 hours of purchase.
Please Note: Items will be posted within 48hrs of payment. Orders placed over weekends will go out the next business day.