| Main centres: | 1-3 business days |
| Regional areas: | 3-4 business days |
| Remote areas: | 3-5 business days |

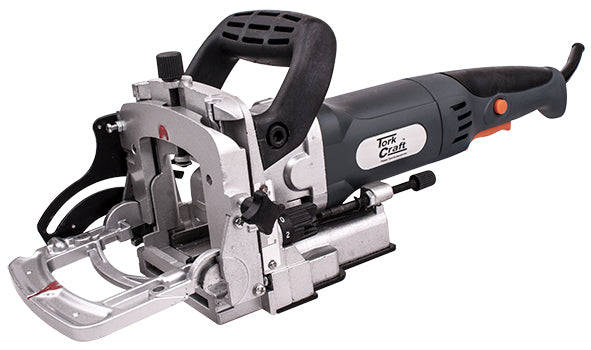
Wattage: 900W
Cuts Slots for: #0, #10 & #20
Rotation speed: 11000 RPM
A biscuit joiner is a woodworking tool used to join two pieces of wood
together. It uses a small circular saw blade to cut a crescent-shaped hole
in the opposite edges of two pieces of wood or wood composite panels.

An oval-shaped, highly-dried and compressed wooden biscuit (made from beech wood)
is covered with glue, or glue is applied in the slot. The biscuit is immediately
placed in the slot, and the two boards are clamped together. The wet glue
expands the biscuit, further improving the bond.
| ORDER NO. | SIZE | QTY |
| PC5551 | #0 | Box of 1000 |
| PC5552 | #10 | Box of 1000 |
| PC5553 | #20 | Box of 1000 |
| BIS010 | #10 | Box of 1000 |
| BIS020 | #20 | Box of 1000 |
| PC5551-50 | #0 | Pack of 50 |
| PC5552-50 | #10 | Pack of 50 |
| PC5553-50 | #20 | Pack of 50 |
| PC5553-100 | #20 | Pack of 100 |
| BIS378 | 378 Pc biscuit kit | |
| ORDER NO. | DISCRIPTION |
| TCP10008 | ø100x22.22xZ8 blade |
| CMT240.008.04 | ø100x22.22xZ8 blade |
| BJ01-3 | Field coil (stator) |
| BJ02-1 | Armature |
| BJ01-2 | Carbon brushes |
| BJ01-4 | Switch |
| BJ01-5 | Slide hook for switch |
| Description | Specification |
| Max RPM | 11000 |
| Max Blade Diameter | 100mm |
| Bore diameter | 22mm |
| Spindle thread | M6 |
| Wattage | 900W |
| Voltage | 230V (50Hz) |
| Max depth cut | 19mm |
| Stop angle | 0° - 90° 90° - 135° |
| Suitable biscuits | #0 #10 #20 |
| Power Cord length | 2m |
| Contents | Biscuit jointer 100mm cutting blade Hex wrench, 5mm Dust collection bag Spare set of carbon brushes |
| Packaging Type | Color cardboard box |
| Packaging weight | 2.9kg |
| Tool weight | 2.2kg |
| Packaging Dimensions | 410mm(L) x 200mm(H) x 185mm(W) |
| Tool Dimensions | 385mm(L) x 190mm(H) x 170mm(W) |
| Material | Gearbox: Aluminum Base Plate: Plastic Handle: Plastic Body: Plastic |
Installing the blades for the Biscuit Joiner is straightforward. Here is a step-by-step guide:
Step 1:
Unplug the power cord, switch off the tool, and wait until all
moving parts have completely stopped before making any
adjustments.
Step 2:
Undo the four screws at the bottom of the base plate and open
the base plate.
Step 3:
Keep the spindle lock button pressed in which is at the top of the
joiner and turn the spindle until it locks. This prevents the blade
from spinning.
Step 4:
Undo the flange nut from the spindle with a hex key.
Step 5:
Put the blade and flange on the spindle. Ensure that the arrow on
the blade matches the arrow on the joiner.
Step 6:
Put the spindle nut on the spindle and tighten with a hex key.
Step 7:
Release the spindle lock button and turn the spindle to verify that
the blade can rotate freely..
Step 8:
Place the base plate in position and tighten the four screws. Check
that the base plate is properly fastened and secured before
starting the tool.
By following these steps, you can safely and e...