
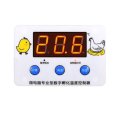
XH-W1320 DC 12/24V Professional Digital Display Incubation Thermostat Egg Hatching Temperature Contr
New
Shipping
Standard courier shipping from R30
R30 Standard shipping using one of our trusted couriers applies to most areas in South Africa. Some areas may attract a R30 surcharge. This will be calculated at checkout if applicable.
Check my rate
Check my rate
Ready to ship in
The seller has indicated that they will usually have this item
ready to ship within 12 business days. Shipping time depends on your delivery address. The most
accurate delivery time will be calculated at checkout, but in
general, the following shipping times apply:
Standard Delivery
| Main centres: | 1-3 business days |
| Regional areas: | 3-4 business days |
| Remote areas: | 3-5 business days |
Returns
Get it now, pay later
Seller
Buyer Protection
Product details
Condition
New
Location
International
Bob Shop ID
615107140
Specification:
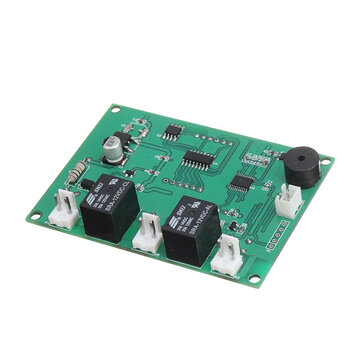
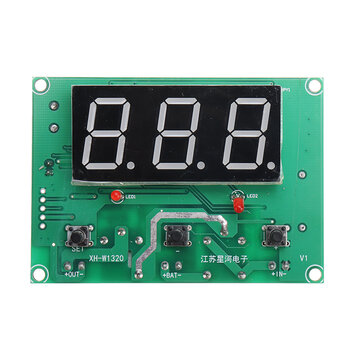
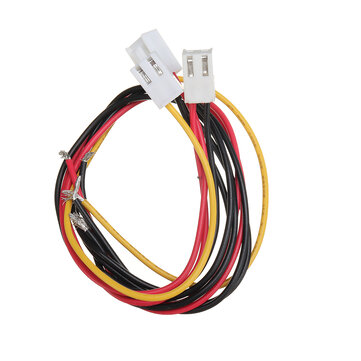
Product Name:?Intelligent incubation temperature controller Product model:?XH-W1320 Temperature measurement range: -30 ~ 110 a?? Temperature measurement accuracy: ± 0.1 a?? Temperature control range:? -9.9 ~ 99.9 a?? Temperature control accuracy: 0.1 a?? Temperature probe: 1 m probe Power supply voltage: DC12V/24V Applicable environment: - 15 ~ 55 a?? / 20% ~ 85% RH Output type: 6A Relay direct output Dimension: 105* 70mm Embedded size: 85*60mm Installation hole distance: 95mm
Product weight: 71g
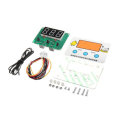
Package included:
1 x?Intelligent incubation temperature controller
Instructions for use:
Long press the setting button for 3 seconds to enter the menu P1 P2 P3 P4
P1 hysteresis setting 1. Long press the setting button for more than 3s to display the P1 hysteresis setting 2. Shortly press the set button to display the hysteresis value, the factory value is 0.2a?? (The setting range of hysteresis is 0.1~30a??) 3. Press the heating/decreasing key to adjust the value
P2 temperature calibration 1. Long press the setting key for more than 3 seconds to display P1, press the heating/decreasing key to switch to P2 temperature calibration 2. Shortly press the SET button to display the calibration value, the factory value 0.0a?? (calibration range-9.9~9.9a??) 3. Press the heating/decreasing key to adjust the value
P3 delay start 1. Long press the setting button for more than 3s to display P1, press the heating/decreasing button to switch to P3 delayed start 2. Shortly press the setting button to display the delayed start value, the factory value is 0 (setting range 0~10 minutes) 3. Press the heating key to adjust the value 4. After the setting is completed, the thermostat will delay after reaching the starting temperature, and then start again according to the set time
P4 high temperature warning 1. Long press the setting key for more than 3 seconds to display P1, and press the heating/decreasing key to switch to P4 high temperature alarm 2. Shortly press the setter key again to display ON (function on)/OFF (function off). 3. Press the heating/decreasing key to adjust to ON, shortly press the setter key again to display the high temperature alarm value (factory value 110a??) 4. Press the heating/decreasing key to adjust the high temperature alarm value 5. After the setting is completed, the thermostat will emit an alarm sound when the temperature reaches the alarm value
I want to control the hatching temperature of chickens at 37.5~38a??, how to set it? 1. Set the stop temperature: short press the set button and the screen number flashes, press the heating/decreasing button to adjust the value to 38a?? 2. Set the hysteresis: long press the setting key for more than 3s, the screen displays P1, then short press the setting key. The displayed value is the current hysteresis value, and the difference between 37.5-38a?? is 0.5a??. Press the heating/decreasing key to adjust the value to 0.5 3. After the setting is completed, the thermostat will start the heating equipment at 37.5?ᆪC for heating, and stop when the temperature rises to 38?ᆪC, and it will continue to cycle.
I actually measured a temperature of 37.8a??, and the thermostat showed 37.6a??, how to calibrate it? 1. Enter the P2 temperature calibration menu: press and hold the setting key for more than 3 seconds to display P1, and then press the heating/cooling key to switch to P2 (temperature calibration) 2. Short press the setting key again to display the current calibration value. The display temperature of 37.6a?? is 0.2a?? lower than the measured temperature of 37.8a??. Press the heating/decreasing key to adjust the value to 0.2a?? to complete the setting.
Product Name:?Intelligent incubation temperature controller Product model:?XH-W1320 Temperature measurement range: -30 ~ 110 a?? Temperature measurement accuracy: ± 0.1 a?? Temperature control range:? -9.9 ~ 99.9 a?? Temperature control accuracy: 0.1 a?? Temperature probe: 1 m probe Power supply voltage: DC12V/24V Applicable environment: - 15 ~ 55 a?? / 20% ~ 85% RH Output type: 6A Relay direct output Dimension: 105* 70mm Embedded size: 85*60mm Installation hole distance: 95mm
Product weight: 71g
Package included:
1 x?Intelligent incubation temperature controller
Instructions for use:
Long press the setting button for 3 seconds to enter the menu P1 P2 P3 P4
P1 hysteresis setting 1. Long press the setting button for more than 3s to display the P1 hysteresis setting 2. Shortly press the set button to display the hysteresis value, the factory value is 0.2a?? (The setting range of hysteresis is 0.1~30a??) 3. Press the heating/decreasing key to adjust the value
P2 temperature calibration 1. Long press the setting key for more than 3 seconds to display P1, press the heating/decreasing key to switch to P2 temperature calibration 2. Shortly press the SET button to display the calibration value, the factory value 0.0a?? (calibration range-9.9~9.9a??) 3. Press the heating/decreasing key to adjust the value
P3 delay start 1. Long press the setting button for more than 3s to display P1, press the heating/decreasing button to switch to P3 delayed start 2. Shortly press the setting button to display the delayed start value, the factory value is 0 (setting range 0~10 minutes) 3. Press the heating key to adjust the value 4. After the setting is completed, the thermostat will delay after reaching the starting temperature, and then start again according to the set time
P4 high temperature warning 1. Long press the setting key for more than 3 seconds to display P1, and press the heating/decreasing key to switch to P4 high temperature alarm 2. Shortly press the setter key again to display ON (function on)/OFF (function off). 3. Press the heating/decreasing key to adjust to ON, shortly press the setter key again to display the high temperature alarm value (factory value 110a??) 4. Press the heating/decreasing key to adjust the high temperature alarm value 5. After the setting is completed, the thermostat will emit an alarm sound when the temperature reaches the alarm value
I want to control the hatching temperature of chickens at 37.5~38a??, how to set it? 1. Set the stop temperature: short press the set button and the screen number flashes, press the heating/decreasing button to adjust the value to 38a?? 2. Set the hysteresis: long press the setting key for more than 3s, the screen displays P1, then short press the setting key. The displayed value is the current hysteresis value, and the difference between 37.5-38a?? is 0.5a??. Press the heating/decreasing key to adjust the value to 0.5 3. After the setting is completed, the thermostat will start the heating equipment at 37.5?ᆪC for heating, and stop when the temperature rises to 38?ᆪC, and it will continue to cycle.
I actually measured a temperature of 37.8a??, and the thermostat showed 37.6a??, how to calibrate it? 1. Enter the P2 temperature calibration menu: press and hold the setting key for more than 3 seconds to display P1, and then press the heating/cooling key to switch to P2 (temperature calibration) 2. Short press the setting key again to display the current calibration value. The display temperature of 37.6a?? is 0.2a?? lower than the measured temperature of 37.8a??. Press the heating/decreasing key to adjust the value to 0.2a?? to complete the setting.


